Approving Manager on a Mobile Device Navigation / Sign-In Guide
First Sign-In:
Before your first sign in, you will be provided a username and a temporary password that is sent to your personal email.
- Navigate to the link provided in the email.
- Type (DO NOT CUT AND COPY) out the username provided in the email.
- Type (DO NOT CUT AND COPY) out the temporary password provided in the email.
- Input a new temporary password.
- Close out the entire web page once the new temporary password has been set.
- Navigate to: https://shifty.arraycorp.com/hb/account/customer-login
Note: The link provided in step 6 is going to be your permanent link to the employee portal.
Future Sign-Ins:
This will be your process for all sign-ins after the first one.
- Navigate to: https://shifty.arraycorp.com/hb/account/customer-login
- Sign in with the credentials you set previously.
Submitting Hours:
This will show you how to navigate the pages in Shifty.
1. After signing in, you will see the "Notification Page" (Shown Below). Here you will see all notifications that are relevant to you.
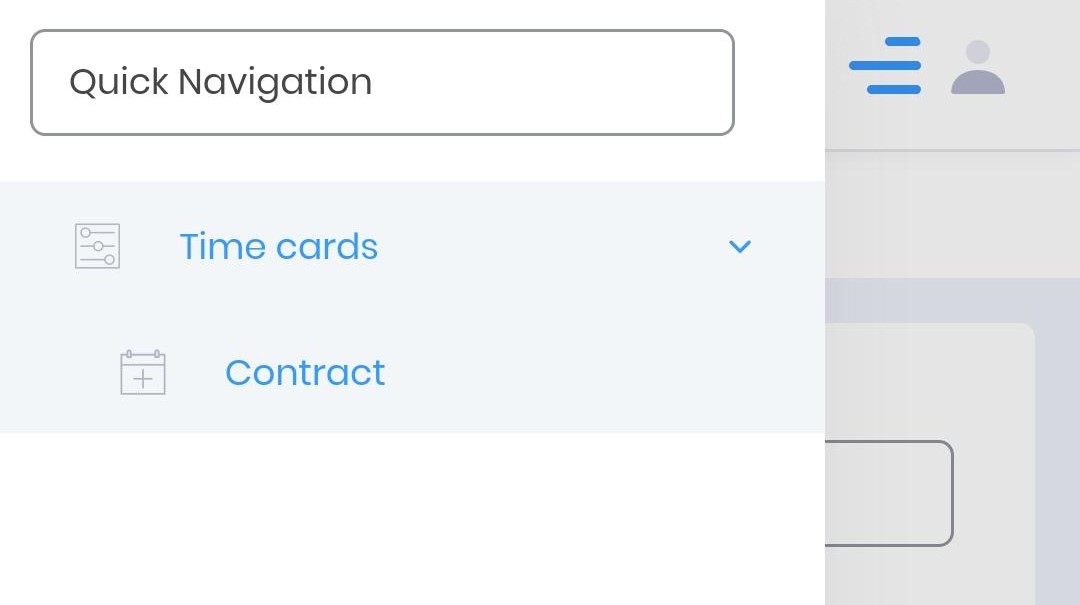
2. Click The 3 Lines next to the gray man in the top right (Shown Below).
3. Select "Time cards" then "Contract" located on the left-hand side of the screen (Shown Below). This will be where you submit your hours.
4. Click the 3 lines once more to exit off this menu.
5. Now you will see "Customer time card approval" at the top of the screen. First, edit the "Date range" to match the time period you are trying to submit your hours.
Note: With these filters, you can narrow down the information shown to you at any given time.
- Employee: Search for a particular employee.
- Time: Sort by time submissions. "Non 0 hours" will filter out all entries that have no time submitted and do not need approval.
6. Next you will see "Pending" and "Approved".
- "Pending" is where all time entries are waiting to be approved by a manager. This is where you review and approve the hours.
- "Approved" is where the time entries show when they have been approved are awaiting to be paid out to your account.
- Note: When the shift has been processed and is going to be paid out by HB Staffing, the shifts disappear from "Approved".
7. Under "Pending" please review and select any time entries you would like to approve by either hitting the topmost check box next to the employee's name to select all of them or selecting the individual date entries.
8. Select Approve on the right to approve the selected time entries.
Note: Any days with no hours listed or 0 hours are like this because the employee has not submitted hours for that day or has not worked that day. Approving them does not charge the company. Rejecting them will require you to leave a note on the entry as to why you are rejecting them. You can also choose to ignore them as you will only be notified if there are hours that need to be approved.
Note: Any days with no hours listed or 0 hours are like this because the employee has not submitted hours for that day or has not worked that day. Approving them does not charge the company. Rejecting them will require you to leave a note on the entry as to why you are rejecting them. You can also choose to ignore them as you will only be notified if there are hours that need to be approved.
7. You're all done!
For any further questions about this process, please don't hesitate to reach out to App Support at: appsupport@array.zohodesk.com.
Related Articles
Approving Managers on a Computer Navigation / Sign-In Guide
First Sign-In: Before your first sign in, you will be provided a username and a temporary password that is sent to your personal email. Navigate to the link provided in the email. Type (DO NOT CUT AND COPY) out the username provided in the email. ...Shifty App Operation
Welcome to the Shift App. This application was created with the soul intention of ensuring accurate and timely hour submission and approval for all of our end users. Below is a list of guides, tips, and tricks on how to navigate and manage the Shift ...Employee Mobile Navigation
First Sign-In: Before your first sign in, you will be provided a username and a temporary password that is sent to your personal email. Navigate to the link provided in the email. Type (DO NOT CUT AND COPY) out the username provided in the email. ...Employee Computer Navigation
First Sign-In: Before your first sign in, you will be provided a username and a temporary password that is sent to your personal email. Navigate to the link provided in the email. Type (DO NOT CUT AND COPY) out the username provided in the email. ...Time Off Request Employee User Guide
For the Employee User: Login to Raymarkable Navigate to Raymarkable (arraycorp.com) Click “Login” in the upper right-hand corner of the screen. Press “Array Login” and then “Market & Central Login”. If prompted, enter your Array email address and ...